Getting a Stalled Fermentation Back on Track
We can all picture a day when we’ve experienced all of the highs. You’ve come up with the best idea for a beer — a clever showcase for a new flavor or ingredient, a new hop combination heretofore unknown to brewer kind. You’ve sweated with mash and boil-powered steam facials. The beer was cooled, the yeast was sent to its pool party, beers were cracked, and everything is going great. The party in the fermenter raged with all the fervor of the best EDM fueled raves – until it didn’t.
Something happened — the quiet hi-hat “clink-clink-clink” of the airlock has unexpectedly stopped. Did the fermentation police bust up the festivities? Did everyone drop from exhaustion before the last bass drop? Did everyone scatter before the cleanup could finish? For whatever reason, the fermentation stopped dead in its tracks and you want to know what to do! We’ve all been there and like the best party planners, we have the tools to clear up the mess and close out your fermentation on a high note.
That’s the subject of today’s column —restarting a stuck fermentation. Though, before we go through the efforts of kicking fermentation back into gear, we must first determine if it truly stopped prematurely.
Verify The Facts at Hand
Before allowing panic to set in, make sure of your supposition. Did the fermentation truly quit early?

Start by asking yourself some basic questions. How many days have you been fermenting? With healthy yeast (remember our repeated mantra — healthy, vital yeast forgives many sins) a normal gravity beer (1.040-1.055) can be done with active fermentation in 2–3 days post pitch. A session beer even quicker, a large beer may take over a week to quit showing obvious signs of fermentation, and all bets are off if you throw a kveik strain at it. (We discount fermentations that are rumored to finish before they even begin as we respect the fundamental laws of physics in this brewhouse.)
The next question, is fermentation truly stalled? Most homebrewers will look to their airlock or blow-off tube and those reassuring tiny bubbles to tell them that things are progressing. The seemingly sudden cessation of emissions has sent many into a tizzy, but while gas evolution is an easy gauge of fermentation, it is not always accurate.
So first, check your airlock. Is it seated firmly and correctly? Is the lid on correctly and closed tight? Given that gas can easily slip through the eye of a needle and will take the path of least resistance, even the most insignificant seeming gaps will still an airlock. Is anything blocking the potential outflow of gas? We’ve caught bucket lids bulging like the nascent Yellowstone Caldera because gunk sealed our airlocks inside the chamber. (Caution is highly recommended when removing that airlock. You might just paint your ceiling.)
Assuming the hatches are battened down and everything should be flowing, your next quick observation to make is whether there is a lovely foam cap of kräusen still swimming in the fermenter? This is where clear carboys are such a benefit as you can see exactly what’s going on inside your fermenter without disrupting anything. If you ferment in a bucket or shiny stainless steel fermenter, you’ll have to open it up to take a peek. Quick, close it! If there’s a cap, be patient and come back a few days later. If not . . . then we measure!
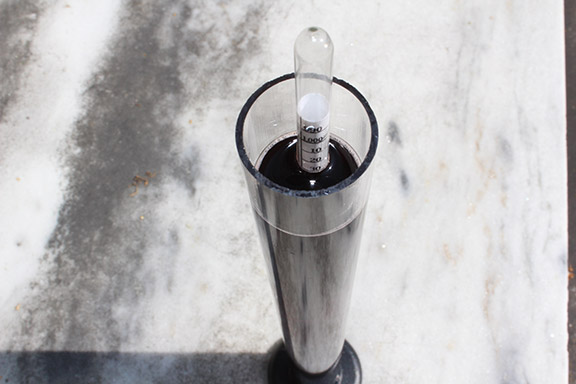
Take a gravity sample. Make sure to properly de-gas the sample lest any stray bubbles buoy your hydrometer and give you an artificially high reading. While some recommend giving it a spin in a blender, a few passes back and forth between glasses should suffice. Measure the gravity. Is it in a reasonable range of where you’d expect it to be? The usual rule of thumb for final gravity is to have it somewhere equal to or lower than a quarter of the original gravity. For our hypothetical “normal” beer of 1.050, we’d expect the gravity — for most yeast strains — to be around 1.012–1.013, or lower (50/4 = 12.5). If your gravity is a little higher, say 1.014–1.016, give the sample a taste. Odds are good that the beer will taste fine and is suitably done. Give it a few more days and then keg or bottle.

As an aside, it would take better beer judges than us to detect that difference from a beer we’re unfamiliar with. As an aside to the aside, one of the things that separates homebrew from commercial brews is where those final gravities land. It’s not uncommon to hear professionals mention that their beers finish a few points lower — 1.004 to 1.008, for instance. Something to think about and then forget as long as you enjoy your beer!
If the gravity isn’t in range, wait a few days more and measure again. Has the gravity moved? If so, great! You’re not dead yet, just moving like dancers towards the end of an old-fashioned dance marathon.
Fixing a sluggish ferment starts with an environment check — is our fermenter too cold? Temperature ranges aren’t instant light switches (“Get this below 60 °F/16 °C and it’s night night!”). They’ll continue to work, just more slowly. Slowly raise the temperature and see if you get further fermentation. Don’t be fooled by a temporary bump in bubbling. As the beer warms, CO2 will come out of solution due to the fact that less gas will dissolve in a warmer solution (Henry’s Law!).
Our anti-sluggard action continues with the brewing equivalent of a good brisk walk to wake back up. Give the fermenter a light bit of agitation — a swirl of the bucket, a bubble of CO2 through the keg or conical — with the aim of putting yeast back into solution and thus back to work. Again, gas will bubble out of the airlock because you’ve knocked it out, so wait and see if fermentation resumes.
If neither of these actions work, or your test gravity samples didn’t move and are pretty far off (and agitating didn’t help there), then it’s time to call in the reinforcements to get the dance floor packed again. It’s time for the REPITCH REMIX.
All you need is a healthy dose of pretty much any neutral-adjacent ale yeast. We keep dried yeast on hand — a pack of a yeast like SafAle US-05, LalBrew BRY-97, LalBrew CBC-1, or a kveik strain will do the trick every day. No dried yeast? A small (1⁄2 cup) slug of yeast slurry from another batch of beer or even a freshly made starter at kräusen will suffice. We don’t recommend using a characterful yeast (say a Belgian strain) just to avoid the tiny contribution it will make to the final flavor. While you may see it recommended in online forums and other places, we also really, really don’t recommend wine or Champagne yeast. They have their own characters (and impacts on other yeast strains) and despite their high alcohol tolerances, they prefer to ferment simpler sugars than some of the more complex sugars found in beer.
With the extra yeast secured, add it to the beer, keep the fermenter at the upper end of your fermentation temperature, and wait a week. If all goes to plan, then this clean-up crew will bring your gravity down to your desired level. If not, try giving it another swirl and letting it go. Don’t add any oxygen when you do these late pitches to avoid damaging the beer!
The Party Is Still Dead
When not even a whole new dance crew can shake the fermentation back to life, and you’ve considered that the pros and cons of leaving the beer be and packaging as is leaves you with too many cons, then it’s time to consider the big guns. We cannot stress enough that these levels of interventions should be considered only when the beer would be a total loss otherwise. Taste and think, taste and think!
First, everyone recommends it, but we honestly don’t know that many people who’ve done it — brew another batch of beer! The theory goes that making a second, lower-gravity beer will allow you to blend and dilute the gravity. It’s a lot of work for an uncertain impact.
Instead, we’d recommend diluting with water or even booze to drop the perceived final gravity. Mike “Tasty” McDole used to thin out a stronger beer with de-aerated carbonated water to make “golfing beer.” There’s no reason you can’t use the trick to make a lower final gravity. We have also used strategic additions of whiskey or schnapps to reach a lower apparent gravity (or in Drew’s case, to add a fruit flavor that is reinforced by the residual beer sweetness). If going this route, do some trials first before blindly pouring a bottle of booze into your fermenter.
Thinking further outside the box, another option is to reach for a cold-acting amylase enzyme (ala Beano). Enzyme additions do not correct failed fermentation, but they change wort fermentability. A small dose of the enzyme will attack the long chain sugars that are probably preventing your beer’s final fermentation. Monitor your gravity and ensure your yeast is healthy and cleaning up after itself. A fair bit of warning though — once added, you cannot stop the process — the enzyme will continue to convert sugars. As people discovered in the brut IPA era, cold enzyme additions can lead to diacetyl butter bombs from yeasts that have not finished fermenting. If you anticipate a challenging beer fermentation from the start, you could always add an enzyme like White Lab’s Ultra-Ferm® to the mash and then denature it during the boil.
A couple of other ideas include trying a diastatic yeast (STA-1 positive) or even relying on hop creep to further dry out a beer that won’t ferment as low as you want. Read more about these options in the “Related Links” at the end of this article.
If even these tricks won’t solve the issue, you may consider this brew a life lesson that teaches as it circles the drain. Learning from mistakes is a part of the hobby.
Party Postmortem
No matter the outcome, you should take a moment after the chaos fades to figure out why things went so squirrelly. There are various factors that can lead to a stalled fermentation, and getting to the bottom of the cause can help prevent it from happening again. Stop and ask yourself:
• Was your yeast truly healthy and raring to go?
• Was the yeast strain used suitable for the alcohol level of your beer?
• Did your malt bill get stuffed with large doses of complex specialty malts?
• Was your mash converting all of your starch into sugar? Did your temperatures favor more long chain sugar creation (high) or maybe the enzymes couldn’t reach starch trapped in mash pockets?
• Did your water have 25+ ppm of calcium?
• Was your final boil pH too low or too high?
• Were there sufficient nutrients to power yeast replication? (Unless you’re doing something spectacularly adjunct heavy, you had enough.)
• At pitch time, what was the wort temperature?
• Were your fermentation temperatures out of whack (too high or too low)?
• If you track fermentation gravity, did something occur around the time of “the stall?”
Look for the odd ducks, the differences, and maybe you can isolate the cause of your dilemma, because we all know that preventing a problem is better than fixing it!