Kegerator Tower Cooling: An alternative chilling system
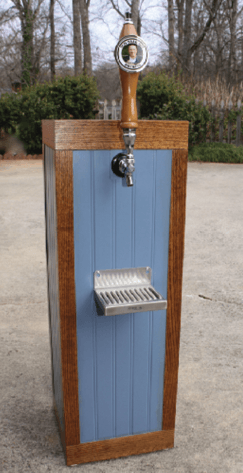
I’m proud to say that as of writing this, I’ve been brewing for twenty years. I spent the first decade of those years producing kits and bottling in flip tops. I read about all-grain brewing processes for longer than I’d care to admit prior to moving away from extract kits. Once I attended my first homebrew club meeting I made the jump to all-grain. Tired of washing bottles and bottling, I promptly made the jump to kegging and haven’t looked back. Bottling is still my least favorite brewing-related activity. I installed my first kegerator in 2014 (pictured below), as an under-counter install. Keeping the tower cool was a challenge, since this kegerator didn’t have anything in place to do so. Relying only on convection led to many a foamy first beer dispense. I put my engineer brain to work to ponder several options.

Several were published in the November 2020 BYO “Advanced Brewing” column; two options mentioned are having a forced air fan, and a glycerol (glycol) recirculating pump. I’m here to tell you there’s another option that is easy to build, inexpensive, and solid state. I built a copper pipe heat sink that keeps my beer lines and tap faucets chilled. The copper wire and pipes conduct heat away from the tower and taps to the fridge’s chilling system. From there the heat is transferred to the refrigerant system. I’ve been through three iterations to get to what I’m presenting here. Each has improved on the last in terms of cooling capability and results.
Copper has a high heat transfer coefficient, and we’ll be using that physical property to our advantage. See the following table for the thermal conductivity of other materials. Given the ubiquity of copper in plumbing and wiring, it’s an ideal choice for this project. Over the many years my heat sinks have been in operation, I have yet to observe any corrosion of the copper despite the moisture often present on the fridge surfaces. I credit the low temperatures slowing the oxidation reaction.

There are a few things to keep in mind when starting a project like this. First, you want the mass of the cold side (attached to the fridge evaporator) to be larger than that of the warm side (up the tower). This will help ensure the net movement of heat away from your faucets. The second is to allow room for all of your tap lines. In this project I only have two 5-mm ID (3⁄16-in.) vinyl lines, so the inner diameter of a 1-in. trade-size copper pipe allows them to fit nicely. Note that they don’t fit with the compression fittings on, so plan accordingly.

Tools and Materials
- Kegerator with tower-
- mounted faucets
- 5 ft. (1.5 m) ½-in. copper pipe
- 6 in. (40 cm) 1-in. copper pipe
- (5) ½-in. copper elbows
- (1) ½-in. copper tee
- (1) 1-in. to ½-in. branched tee
- Zip ties
- Zip tie mounts
- 12 in. (30 cm) 14-gauge
- copper wire
Steps

1. Make Space
My kegerator came with a forced air fan, which I didn’t find worked well and added extra noise. It also had a storage rack that I removed. You should also decide whether you want to store your CO2 inside or outside your refrigerated space. I prefer to keep it externally for a few reasons. It allows for more space for kegs and bottles. Additionally, the CO2-tight seals and threaded fittings of the tank and regulator won’t be subject to low temperatures.

2. Measure and Design
Noting that my evaporator is off center, I designed the copper rectangle accordingly, and slightly undersized compared to the footprint of the evaporator. The top of the rectangle tees up, elbows to the tower opening, and connects to the branched tee adapter where my beer lines plumb into the kegerator’s tower.
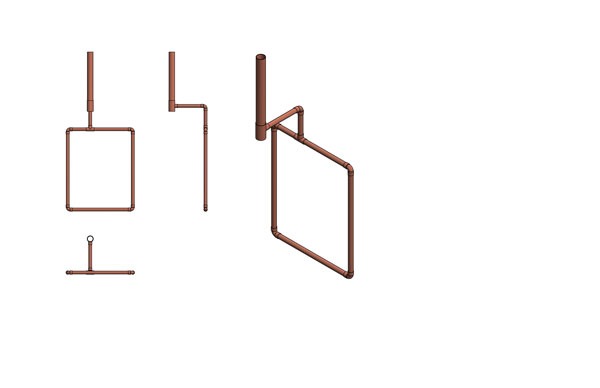
3. Cut and Build the Evaporator Side
The copper apparatus can be pre-assembled and fixed in place using adhesive zip tie mounts. Additional metal connection between the evaporator and the copper piping could improve the heat transfer as well; you don’t want to sub-cool the copper or have condensation freeze like it can on the fridge components. I didn’t solder the joints when assembling as the zip ties hold it in place securely. This also allows me to add more copper to the cold side in the future if I see fit. With the components in hand, you’ll also need a copper pipe cutter and wire cutters for trimming the zip ties. I started from the evaporator side and dry fit my elbows and tees to get my pipe lengths. Cut, dry fit, measure, and repeat. I stopped at the reducing tee, as the riser is the last thing to install. Here is a rendering of my design, adjust yours as needed for your kegerator.

4. Measure, Cut, and Install the Riser
Once I had the reducing tee in place I fed my 1-inch pipe up through the tower to determine its length. Remember for all these pipes that they insert into the fittings to various degrees, so always account for that. The 1-inch copper stops short of the faucet shank barbs. The riser pipe is dropped in from above and sockets into the reducing tee. See the adjacent image of the copper heat sink installed on evaporator.

5. Install Beer Lines and Shanks
Once in place I added some tower insulation and ran my beer lines. Of the three kegerators I’ve owned, I’ve never found one with adequate insulation, so I usually add a bit extra to the sides and on top of the shanks. Plumbing pipe insulation works well for this, and comes in several different diameters, allowing a snug fit.

6. Completing the Circuit
The last step is to add some copper wire that wraps around both shank barbs with the excess (again more mass on the colder side) stuffed into the open pipe end. This last bit helps to keep the faucets cold.
If you live somewhere with lots of humidity, you may see condensation on your faucets on warm days, but that just means your beer is cold. Since the faucet is still exposed to room temperature air, it will still be warmer than the beer, so you can expect a bit more foam in your first pint.
There you have it. Tap those kegs and have a brew!