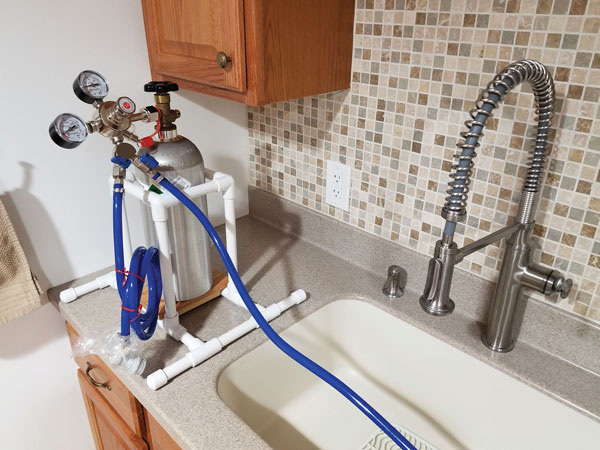
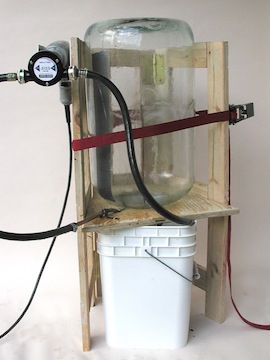
There always seems to be something that needs attention with my brew-making hobby that requires some creative action to solve a nagging issue. This time, it was my spare 5-lb. CO2 cylinder that had a mind of its own wanting to get tipsy (but not from drinking too much homebrew). That double gauge pressure regulator with two product outlets, two gas line hoses each with a gas-in ball-lock fitting on the end and installed on the gas cylinder valve adds extra weight at the top of the cylinder. This makes it all too easy for the cylinder to tip over, especially when the tank contents start running on empty.
One of the concerns was a tip-over event when using the cylinder for purging activities. The first thing I do after filling a keg of homebrew and before placing it in the kegerator is to perform numerous CO2 pressurize-and-vent cycles to rid the headspace of oxygen. This keeps the beer fresh while it chills and carbonates. Even when gently tugging on the gas line hose to connect it to the keg gas-in post, that tug will tend to tip the cylinder over. Careful attention is required to keep the cylinder in the upright position. This concern also applies when using my Tapcooler counter-pressure bottle filler to purge bottles prior to filling.
Another issue is storing of the cylinder when not in use. In my brewing storage area, I have many items nearby that could cause a tip-over when moving things around. So, I always worry that the cylinder will get accidently knocked over. These worries revolve around two potentially disastrous results: Either the valve breaking off and the cylinder becoming a projectile or the regulator breaking from a bad fall.
This makes it all too easy for the cylinder to tip over, especially when the tank contents start running on empty.
These concerns led me to do some internet searching to gather some ideas for a do-it-yourself (DIY) project that I could make to add some stability for my CO2 cylinder. Efforts focused on finding a solution for my desired design constraints that included being light in weight, easy to construct, stable, portable, use readily available materials, and kept at a minimal cost. I found PVC to be the ultimate make-anything-toy-set, as you can pretty much make anything you can think of by just using some fittings and pipe.
Other considerations that factor into a satisfactory solution are taking advantage of tools and extra stuff that you might already have. Of course, like all DIY projects, there are countless ways to end up solving a particular issue that one may have. The final solution therefore features PVC materials and wood scraps that best satisfied my design constraints.
If you are somewhat handy, have the time, want to make something simple, and stop your cylinder and regulator from meeting a tragic ending, this solution is for you.
Tools and Materials
(4) ½-in. 90-degree PVC side outlet elbow
(8) ½-in. 90-degree PVC tee
(4) ½-in. schedule 40 PVC cap
(5) ½-in. x 2 ft. (61 cm) 600-psi schedule 40 PVC white.
PVC cement
Doorjamb scrap (about 8-in. long x 45⁄8-in. wide x 5⁄8-in. thick or 20 cm x 11.4 cm x 1.5 cm)
1×2 wood scraps
Miter saw
Wood glue
Danish oil (natural oak)
Steps
1. MATERIAL SELECTION
I decided to use half-inch PVC piping to keep the stand bulk and weight to a minimum, while still being rigid and sturdy. PVC side outlet elbows, PVC tees, and PVC caps are used to provide the necessary piping connections for the stand. PVC cement was used to provide a permanent structure. The critical material selection factor is to lay out the design to determine the overall length of PVC piping required.
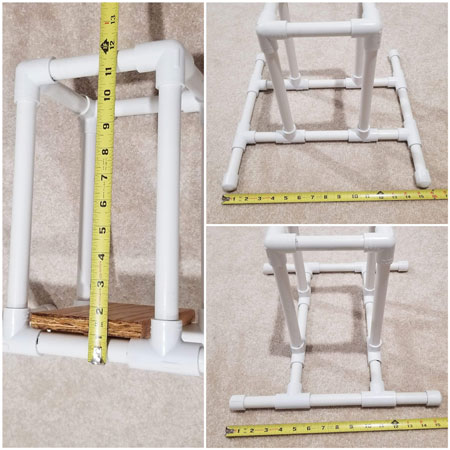
2. DIMENSIONS
The first thing you need to do is determine the overall length of PVC pipe required. My general design focused on the stand height, length, and widths. Stand height is limited to the overall height of the CO2 cylinder, while avoiding interference from the gas regulator, hoses, and fittings. With the stand height now determined, the stand base width and length were chosen to match the cylinder height as measured from the cylinder bottom to the threaded male connection on the gas cylinder valve, as this seemed to make the most sense to provide the desired stability while at the same time not being too excessive. Some factors to consider when measuring the desired piping lengths are to account for the maximum insertion depth of the pipe into the fitting as well as the fitting dimensions. These dimensions may be different for each PVC manufacturer.
3. PVC CUTS
Before cutting the PVC piping, you may want to remove the ink markings for a clean finish. If this is desired, then wipe off the ink print with nail polish remover and an old rag. Another option would be to use furniture-grade PVC.
First, cut four 9.5-in. (24-cm) vertical pipes. Make sure that when the wooden base is installed, the top of the PVC fittings will not interfere with the gas hoses.
Then cut eight 4.75-in. (12-cm) pieces to be used to surround the cylinder in a square configuration, making sure the lengths are long enough so that the cylinder can be inserted and removed easily from the stand, yet short enough to keep the cylinder snug within the stand. Four 4.75-in. (12-cm) pieces will be installed at the top, and the other four pieces at the bottom. After installing the piping into the fittings, the square length and width inside measurements should be slightly larger than the cylinder diameter.
For the stand length and width extensions on the bottom portion, cut four 3.25-in. (8.3-cm) pieces (to be used with the pipe caps) and four 3.75-in. (9.5-cm) pieces. These lengths are not too critical, but should be enough to use most of the remaining PVC piping.
4. ASSEMBLY
Assemble the top square using the 90-degree side outlet elbows and four of the 4.75-in. (12-cm) pieces. Before gluing with PVC cement, make sure the cylinder will fit within the square. Attach the four vertical legs at the bottom of the side outlet elbows.
Next, assemble the stand bottom section using the remaining PVC piping pieces, eight tee fittings, and four PVC pipe caps. Check for overall fit-up before gluing with PVC cement. As an option, you may wish to make some of the extensions removable, if desired, for your particular application and usage.
Finish the assembly by joining the stand bottom section with the top vertical section. Once assembled, the overall length and width of the stand was a few inches longer than the stand height.
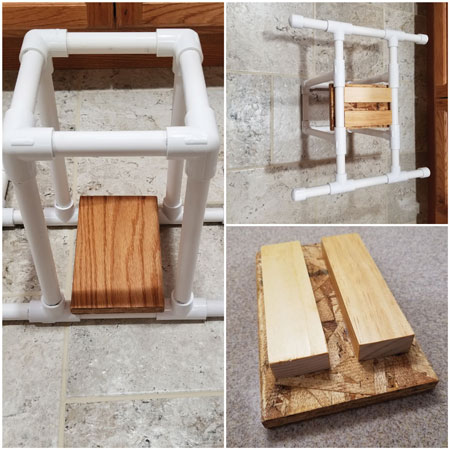
5. BASE
I always keep a pile of wood scraps around at the completion of any woodworking project. In my scrap pile, I found a small section of doorjamb and some 1×2 scraps to construct the base where the cylinder rests when in the stand. I cut the doorjamb to match the width of the stand (7.5 in./19 cm), and cut two 1×2 pieces to fit tight and snug between the PVC piping on the underside of the base. I sanded smooth with sandpaper and then stained the wood pieces with Danish Oil natural oak (another woodworking project leftover) to provide a neat and professional look. The 1-inch x 2-inch pieces were then glued and clamped to the base, and then installed in the stand after the glue dried. With the wood base installed, the total weight of the CO2 stand was 3 lbs. (1.4 kg).
6. STEADY EDDIE
Finally, it is now time to insert the cylinder into the stand. A gentle tug on the gas line hose should reveal that the base stabilizes the cylinder to ensure it is no longer tipsy. For bottle-purging activities I can now place the stand on my countertop, which I find to be much more convenient and comfortable. Problem solved!
Build a peristaltic pump to pull liquids from one place and push them to another; no priming needed.
This website uses cookies to improve your experience. You can opt-out if you wish.AcceptRejectRead More
Privacy & Cookies Policy
Privacy Overview
This website uses cookies to improve your experience while you navigate through the website. Out of these, the cookies that are categorized as necessary are stored on your browser as they are essential for the working of basic functionalities of the website. We also use third-party cookies that help us analyze and understand how you use this website. These cookies will be stored in your browser only with your consent. You also have the option to opt-out of these cookies. But opting out of some of these cookies may affect your browsing experience.
Necessary cookies are absolutely essential for the website to function properly. This category only includes cookies that ensures basic functionalities and security features of the website. These cookies do not store any personal information.
Any cookies that may not be particularly necessary for the website to function and is used specifically to collect user personal data via analytics, ads, other embedded contents are termed as non-necessary cookies. It is mandatory to procure user consent prior to running these cookies on your website.