Frankenfridge
Homebrewing is a hobby that allows a great sense of satisfaction when you can pour a delicious pint and say to yourself, “Wow, I made that.” But why stop there? For the imaginative tinkerers, it is also an opportunity to utilize everyday household objects in unique ways to create your own brewing equipment.
For many, fermenting as a homebrewer starts with a bubbling bucket in the corner of the basement and, fingers crossed, you end up with something palatable. After they’ve tasted that first successful brew, the crafty ones start thinking; what can I use to make equipment at home to better mimic a brewery’s equipment and processes to make that next batch even better? Of course, there is always the option of buying stainless jacketed conicals and commercial glycol systems scaled down to homebrew sizes. The stainless is pretty, not going to deny that, but you can’t stand back, admire it, and say, “Wow, I made that.”
What are breweries able to do on the cold-side that elevates their product quality over the bubbling bucket in the corner? The top things that come to mind are full temperature control, the ability to drop yeast and hops, and pressurizable fermenters that minimize oxygen contact, facilitate closed transfers, and have the capability to cold condition.
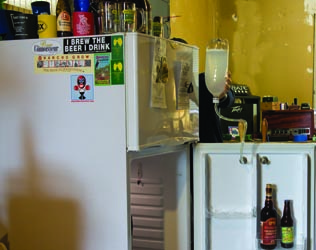
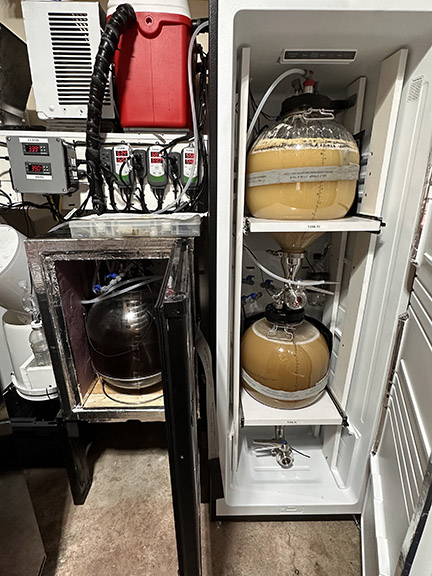
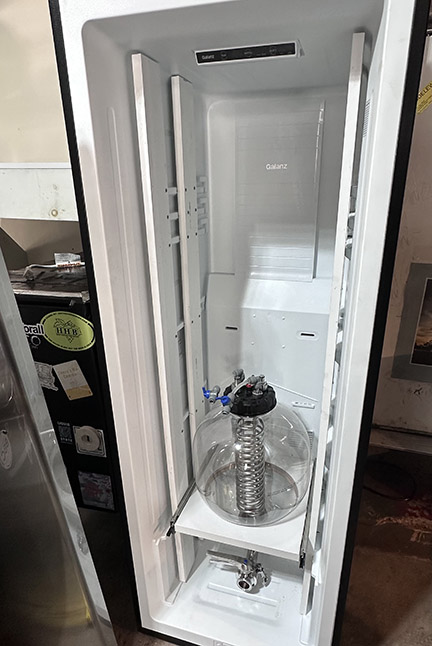
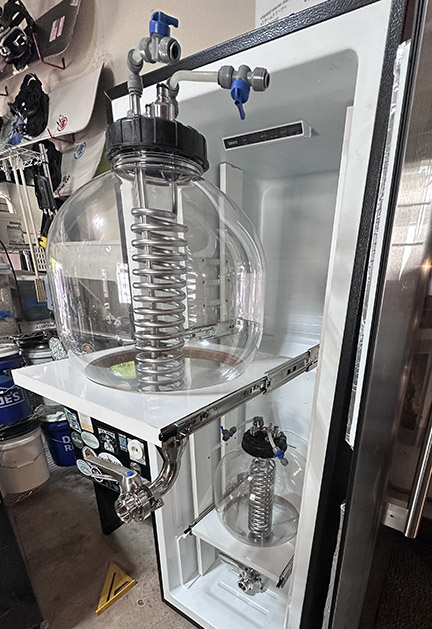
If you’re one of those crafty brewers looking for project inspiration, meet Frankenfridge. Frankenfridge is a conglomerate of regular household items along with retail homebrewing equipment that accomplishes all those tasks, and then some. Its body consists of a 13 cu/ft (0.4 cu/m) upright freezer and an old dorm fridge with a wooden extension collar. Inside the freezer functioning as the main fermentation chamber is a spine made of PVC boards and laminated wood shelving rescued from a neighbor’s trash, and a set of locking drawer slides. Resting in and protected by the spine are two 7-gallon (27-L) Tri-Conical FermZilla tanks. Each tank is fitted with a temperature twister cooling coil, FermZilla thermowell, and stainless steel pressure kit as well as a FermZilla stainless tri-clamp reducing elbow and a lightweight 1.5-inch tri-clamp butterfly valve from BrewHardware. The accompanying chamber next to it is made from an old dorm fridge. It functions as a brite tank chamber and houses an 8-gallon (30-L) FermZilla All Rounder fitted with the same chiller coil, thermowell, and stainless pressure kits as the other tanks.

The heart is a 5,000-BTU window air conditioner (AC) unit with its blower fan removed and evaporator coil carefully re-oriented to fit into a 28-qt. (26.5-L) Igloo cooler. The heart is responsible for keeping the 65% distilled water/35% food-grade inhibited propylene glycol flowing through the system. Inside the cooler are three 550-GPH submersible pond pumps meant for outdoor fountains or fishponds, whose job is to recirculate the glycol solution to the stainless chiller coils for each of the three tanks and back to the cooler reservoir through insulated tubing.
The brain is a bank of six Inkbird temperature controllers, sending and receiving electrical impulses to maintain complete control of temperatures throughout Frankenfridge. There is one controller for each tank receiving temperature information from the probe in its thermowell.
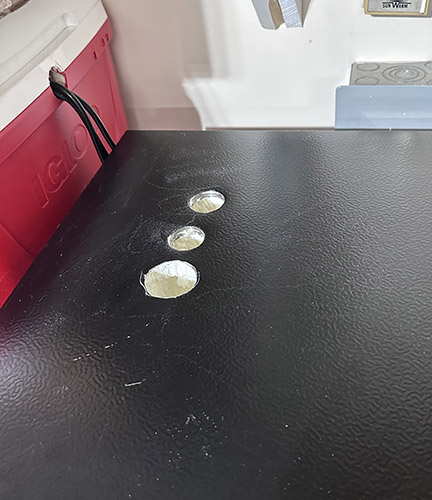
When a tank’s temperature rises outside its programmed range, the temperature controller will send power to the pond pump associated with that tank and recirculate the glycol solution until the temperature comes back to the set range. Conversely, if a tank needs to be heated up, the Inkbird will send power to the seedling heat mat wrapped around the outside of the tank and heat it until it’s back within the set range. Both the dorm fridge and the upright freezer chambers have a temperature probe sending info back to their own Inkbird controller as well to maintain the temperature within the chamber itself. Each of these temperature probes is taped to the outside of a small soda bottle filled with water and wrapped in a small layer of pipe insulation. Without taking its reading from some sort of thermal mass, a temperature probe hanging in open air will see rapid and drastic temperature fluctuations causing excessive, frequent short run cycles that can cause premature failure of your chamber’s compressor unit. The last temperature controller has its probe submerged in the glycol tank, triggering the AC unit to run anytime that solution starts to warm, keeping that tank cold and ready.
My, how Frankenfridge has grown. Having started out many years ago as a single 2×6 wood collar on an old black dorm fridge proudly housing a bubbling brew bucket, it has gone through multiple modifications and reconstructions over its lifetime to become what it is today. Is it finally done? Time will tell. What hasn’t changed though, is that with every modification, every upgrade, every new aspect that makes it one step closer to successfully mimicking professional brewery processes, there is a satisfaction of standing back and being able to say, “Wow, I made that!”
Unlike most “Projects” columns in BYO, I’m purposefully going to skip giving exact measurements and a materials list, as this project was custom-built to fit my own equipment and needs. The hope in sharing it is that homebrewers who would like to build something similar can glean ideas from what I have done and then create their own design using the equipment available to them.
Step by Step
1: Interior Freezer Frame
The most dramatic change to Frankenfridge came with the addition of the upright freezer and conical tanks. The frame for the tank shelves uses PVC boards affixed to the inside of both side freezer walls. The boards and the freezer’s molded shelf supports were scuffed with a file where they would come into contact with each other; before being secured with epoxy and coarse screws. Take care not to use screws that will penetrate past the depth of the molded shelf supports to assure no vital components within the freezer wall are punctured by them.
2: Preparing Shelves
Using a circle jig and a router, smooth holes were cut into the laminated shelving to accept the conical tanks. Whatever your method to cut the holes, assure that they are smooth and perfectly round to not cause any areas of uneven pressure on the walls of the tank and risk damaging the tanks. Multiple coats of clear coat waterproof sealant were then applied before affixing the drawer slides to the shelves and attaching the shelf assembly to the PVC boards.
3: Drilling Line Holes in the Freezer
Now it’s time to really focus. Slow down. It’s time to drill holes through a perfectly good freezer and either continue making it a super cool fermentation chamber that will be the envy of all your brew friends, or destroy it. There’s no middle ground here. The walls of most new freezers are filled with some sort of foam and also have all their condenser coils running throughout the walls just under the metal exterior skin. Puncturing one of these coils spells death for the freezer. There’s no surefire way to know where the coils are exactly. With this particular freezer, I found that when I turned it on and it started to cool down, the sides all got warm, indicating there were condenser coils there. However the top never warmed up at all, suggesting it may not contain any coils there. To be safe, I’d suggest cutting through the plastic inside of the freezer first. SLOWLY dig through and remove the foam with a small wooden dowel until you’ve cleared all the way to the outer metal skin without encountering any coils. Then and only then, drill through the outer skin of the freezer to meet your hole inside.
4: Running Glycol Lines, Wires, & Tubes
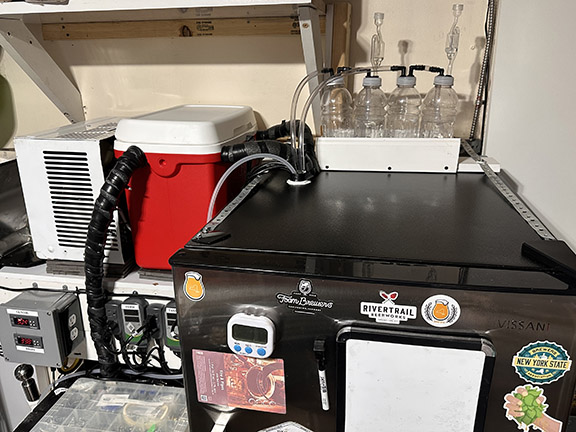
Now it’s time to run all the wires and tubing through those holes. The hole in the rear is access for the two glycol lines, wrapped in pipe insulation, coming in from the pond pumps in the glycol reservoir to the chiller coil in each tank. The middle hole houses the return lines for the glycol returning to the reservoir. Temperature probe wires, power cords from the seedling heat mats and the auxiliary fan, and the blowoff tubes from each fermenter pass through the larger front hole. The two-vessel blowoff setup for each fermenter seen on top of the freezer is an extra layer of protection from oxygen and/or sanitizer suckback as fermentation slows, prior to pressurizing the fermenters to cold crash. The first bottle is empty and allowed to fill with CO2. The second has tubing submerged in sanitizer creating the airlock. The “S” bubbler on top is unnecessary, but I just like to see the bubbling. On the note of necessity, notice the metal strapping that anchors the unit to the wall using the freezer door mounting holes. Extending the shelf with a full fermenter in it could be a catastrophic undertaking without it being adequately secured to the wall studs.
5: Fan & Temperature Probe
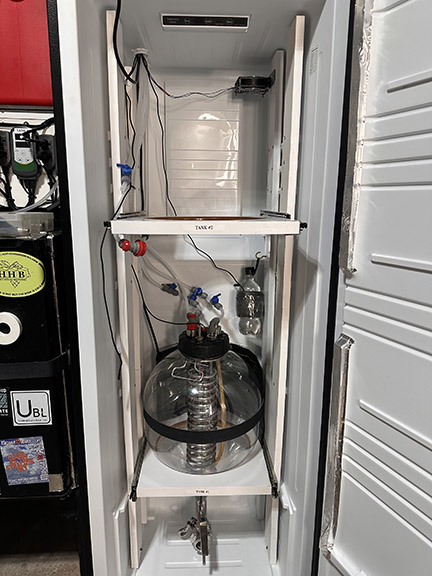
As the project comes to completion, you can see the 110V auxiliary computer fan mounted in the top right corner to keep air moving and maintain even temperature throughout the chamber. Down from it is the temperature probe for the chamber itself, with the water-filled soda bottle for some thermal mass as mentioned earlier. You’ll also notice the molded shelving brackets on the inside of the door have been cut flush and covered with a foil tape to increase the clearance inside for the tanks and drawers.